When you run the ManuSoft Workstation Installation process on the ManuSoft Install CD two ODBC Data Sources are created that are used by Crystal Reports to access your ManuSoft data: ManusoftDAT and ManusoftSQL. These are “User DSNs” which mean that they are tied to the particular user who is logged in at the time that you run the install CD. (There are also “System DSNs” which are shared by all users on a particular computer, but it is not appropriate for Manusoft to use these, as it is a user application, not a system service.)
If you change the user who is logging in to a particular PC, or if you are running Terminal Services so that effectively all your users are connecting to a single PC, then it is not necessary to re-run the Workstation Installation for every user, as this involves recopying all the Crystal Reports DLLs as well as creating the ODBC entries. Instead you can manually create the ODBC entries and just get on with things.
(Note: If this is a PC, not a Terminal Server, then sometimes going into “Programs and Features” (previously known as “Add and Remove Programs) in the Control Panel, locating the ManuSoft entry, and clicking on “Repair” is an even easier solution than doing things manually.)
The first thing to be aware of is the complications that can arise on 64-Bit Windows. ManuSoft is a 32-Bit program and as such “talks” to 32-Bit ODBC drivers. On 64-Bit Windows XP, Vista and Windows 7, if you go into “Control Panel” -> “Administrative Tools” -> “Data Sources (ODBC)” then you end up opening the 64-Bit ODBC applet, and things don’t work quite right. In this case, manually run the 32-Bit ODBC Applet by going in to “Start” then “Run”, then entering “%windir%\SysWOW64\odbcad32.exe” as the program you wish to run. Starting with Windows 8, Microsoft has stopped hiding the 32-bit ODBC applet in the Control Panel, so you just need to make sure you start the correct one.
Once you have the “ODBC Data Source Administrator” open and displaying the “User DSN” tab, go through the following steps to create the ODBC entries:
- Click “Add…” and select “Microsoft Text Driver (*.txt, *.csv)” from the list and click “Finish”. (Note: Do not select the “Microsoft Access Text Driver(*.txt, *.csv)”.)
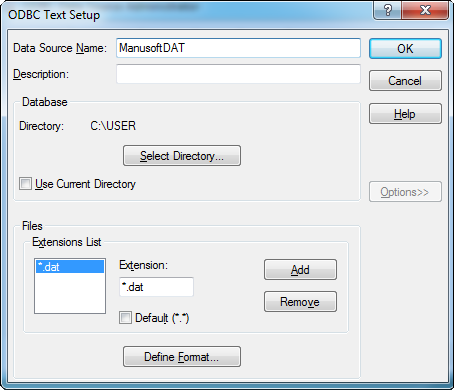
- An “ODBC Text Setup” dialog opens. Set it up as follows:
Data Source Name: ManusoftDAT
Use Current Directory: Unticked
Select Directory: Browse to your “Crystal Reporting Drive” as defined in your ManuSoft System Installation program. It is typically something like “C:\User”, or “H:\User”.
Click “Options>>” to see:
Default (*.*): Unticked
Extensions List: *.dat (Enter this using the “Remove” and “Add” buttons and “Extension” text box.)
Your dialog should look similar to this:
Click “OK” to save your changes and close the window. - Click “Add..” again and select “SQL Server” from the list and click “Finish”.
- A “Create New Data Source to SQL Server” wizard-style dialog will open.
- On the first screen enter:
Name: ManusoftSQL
Sever: The name of your SQL Server running ManuSoft, something like “SERVER\SQLExpress” or “SERVER\MANUSOFT”. You can click the drop-down arrow to get, after a pause, a list of SQL Servers on your network, but it is not guaranteed that your ManuSoft SQL server will appear in this list, depending on your configuration.
Click “Next >” to move to the next screen. - On the second screen accept all the default settings. (i.e. Login “With Windows NT authentication using the network login ID” and “Connect to SQL Server to optain default settings…”.)
Click “Next >” to move to the next screen. There may be a pause as the connection is made. If you get an error at this point use the back button to check the name of the SQL Server you entered on the first page, or get in touch with ManuSoft support. - On the third screen:
Tick the box “Change the default database to”, and select your Manusoft database from the drop-down list. (Typically named something like “CompanyNameLive”.)
Leave all other settings on this screen on their defaults. - On the fourth and last screen leave all the settings on their defaults and click “Finish”.
- A final confirmation dialog opens. You can click “Test Data Source…” just to confirm everything is working, then click “OK” to close everything and return to the “ODBC Data Source Administrator”.
- Click “OK” to close the “ODBC Data Source Administrator”.
That’s it! Start ManuSoft and test a few reports to make sure things are working; printing a Job Ticket is a good test of both the ManusoftDAT and ManusoftSQL data sources.
If things are not working, then there is a common bug found in some versions of Windows. Go back into the “ODBC Data Source Administrator”, select the ManusoftDAT data source, click “Configure”, then click on “Options>>” to expand the window. Your display may look like this:
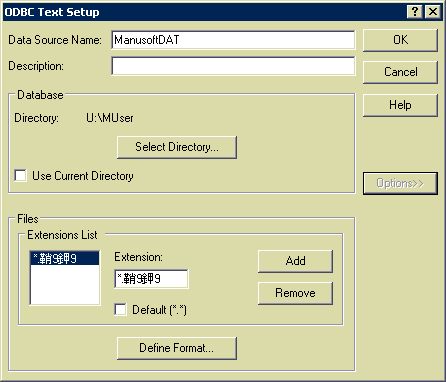
Note the Chinese/Japanese letters in the extension list? They should obviously not be there, but no matter how many times you try to remove them using the “ODBC Text Setup” dialog, it will always come back, thanks to the bug. Instead you’ll have to edit the value directly in the System Registry using the “RegEdit” program:
- Click “Start” -> “Run” and enter “regedit” and click OK.
- You may get a “security prompt” of some sort before the program starts. Accept the warnings and enter your password if required.
- In the “tree view” on the click click on the arrows/plus boxes next to the following headings to drill-down to the entry we want:
HKEY_CURRENT_USER
Software
ODBC
ODBC.INI
ManusoftDAT
Engines - Click on the “Text” folder which in inside the “Engines” folder you just opened. The bottom status line should now read:
“Computer\KEY_CURRENT_USER\Software\ODBC\ODBC.INI\ManusoftDAT\Engines\Text” and your display will look like this:
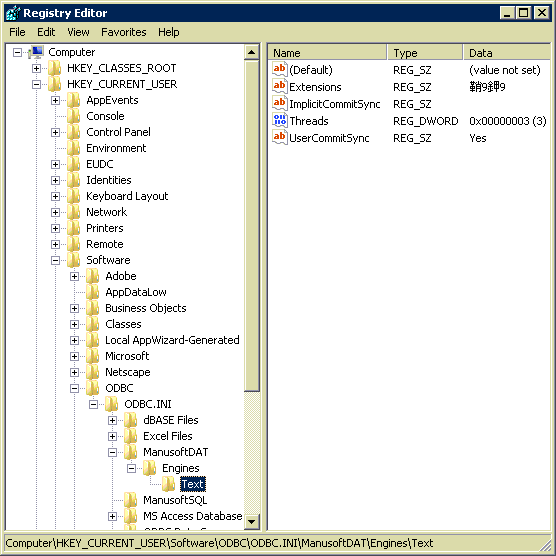
Note the Chinese/Japanese characters are next to the “Extensions” value on the right hand side. - Double click on the “Extensions” entry to open an “Edit String” dialog box.
Delete the bad characters in the “Value data” text box and enter “dat” instead. - Clock OK to close the dialog, then close the RegEdit program
Hopefully that will fix the error for good, unless you go into the “ODBC Text Setup” dialog in Control Panel, but it should be necessary for you to ever go back there anyway.